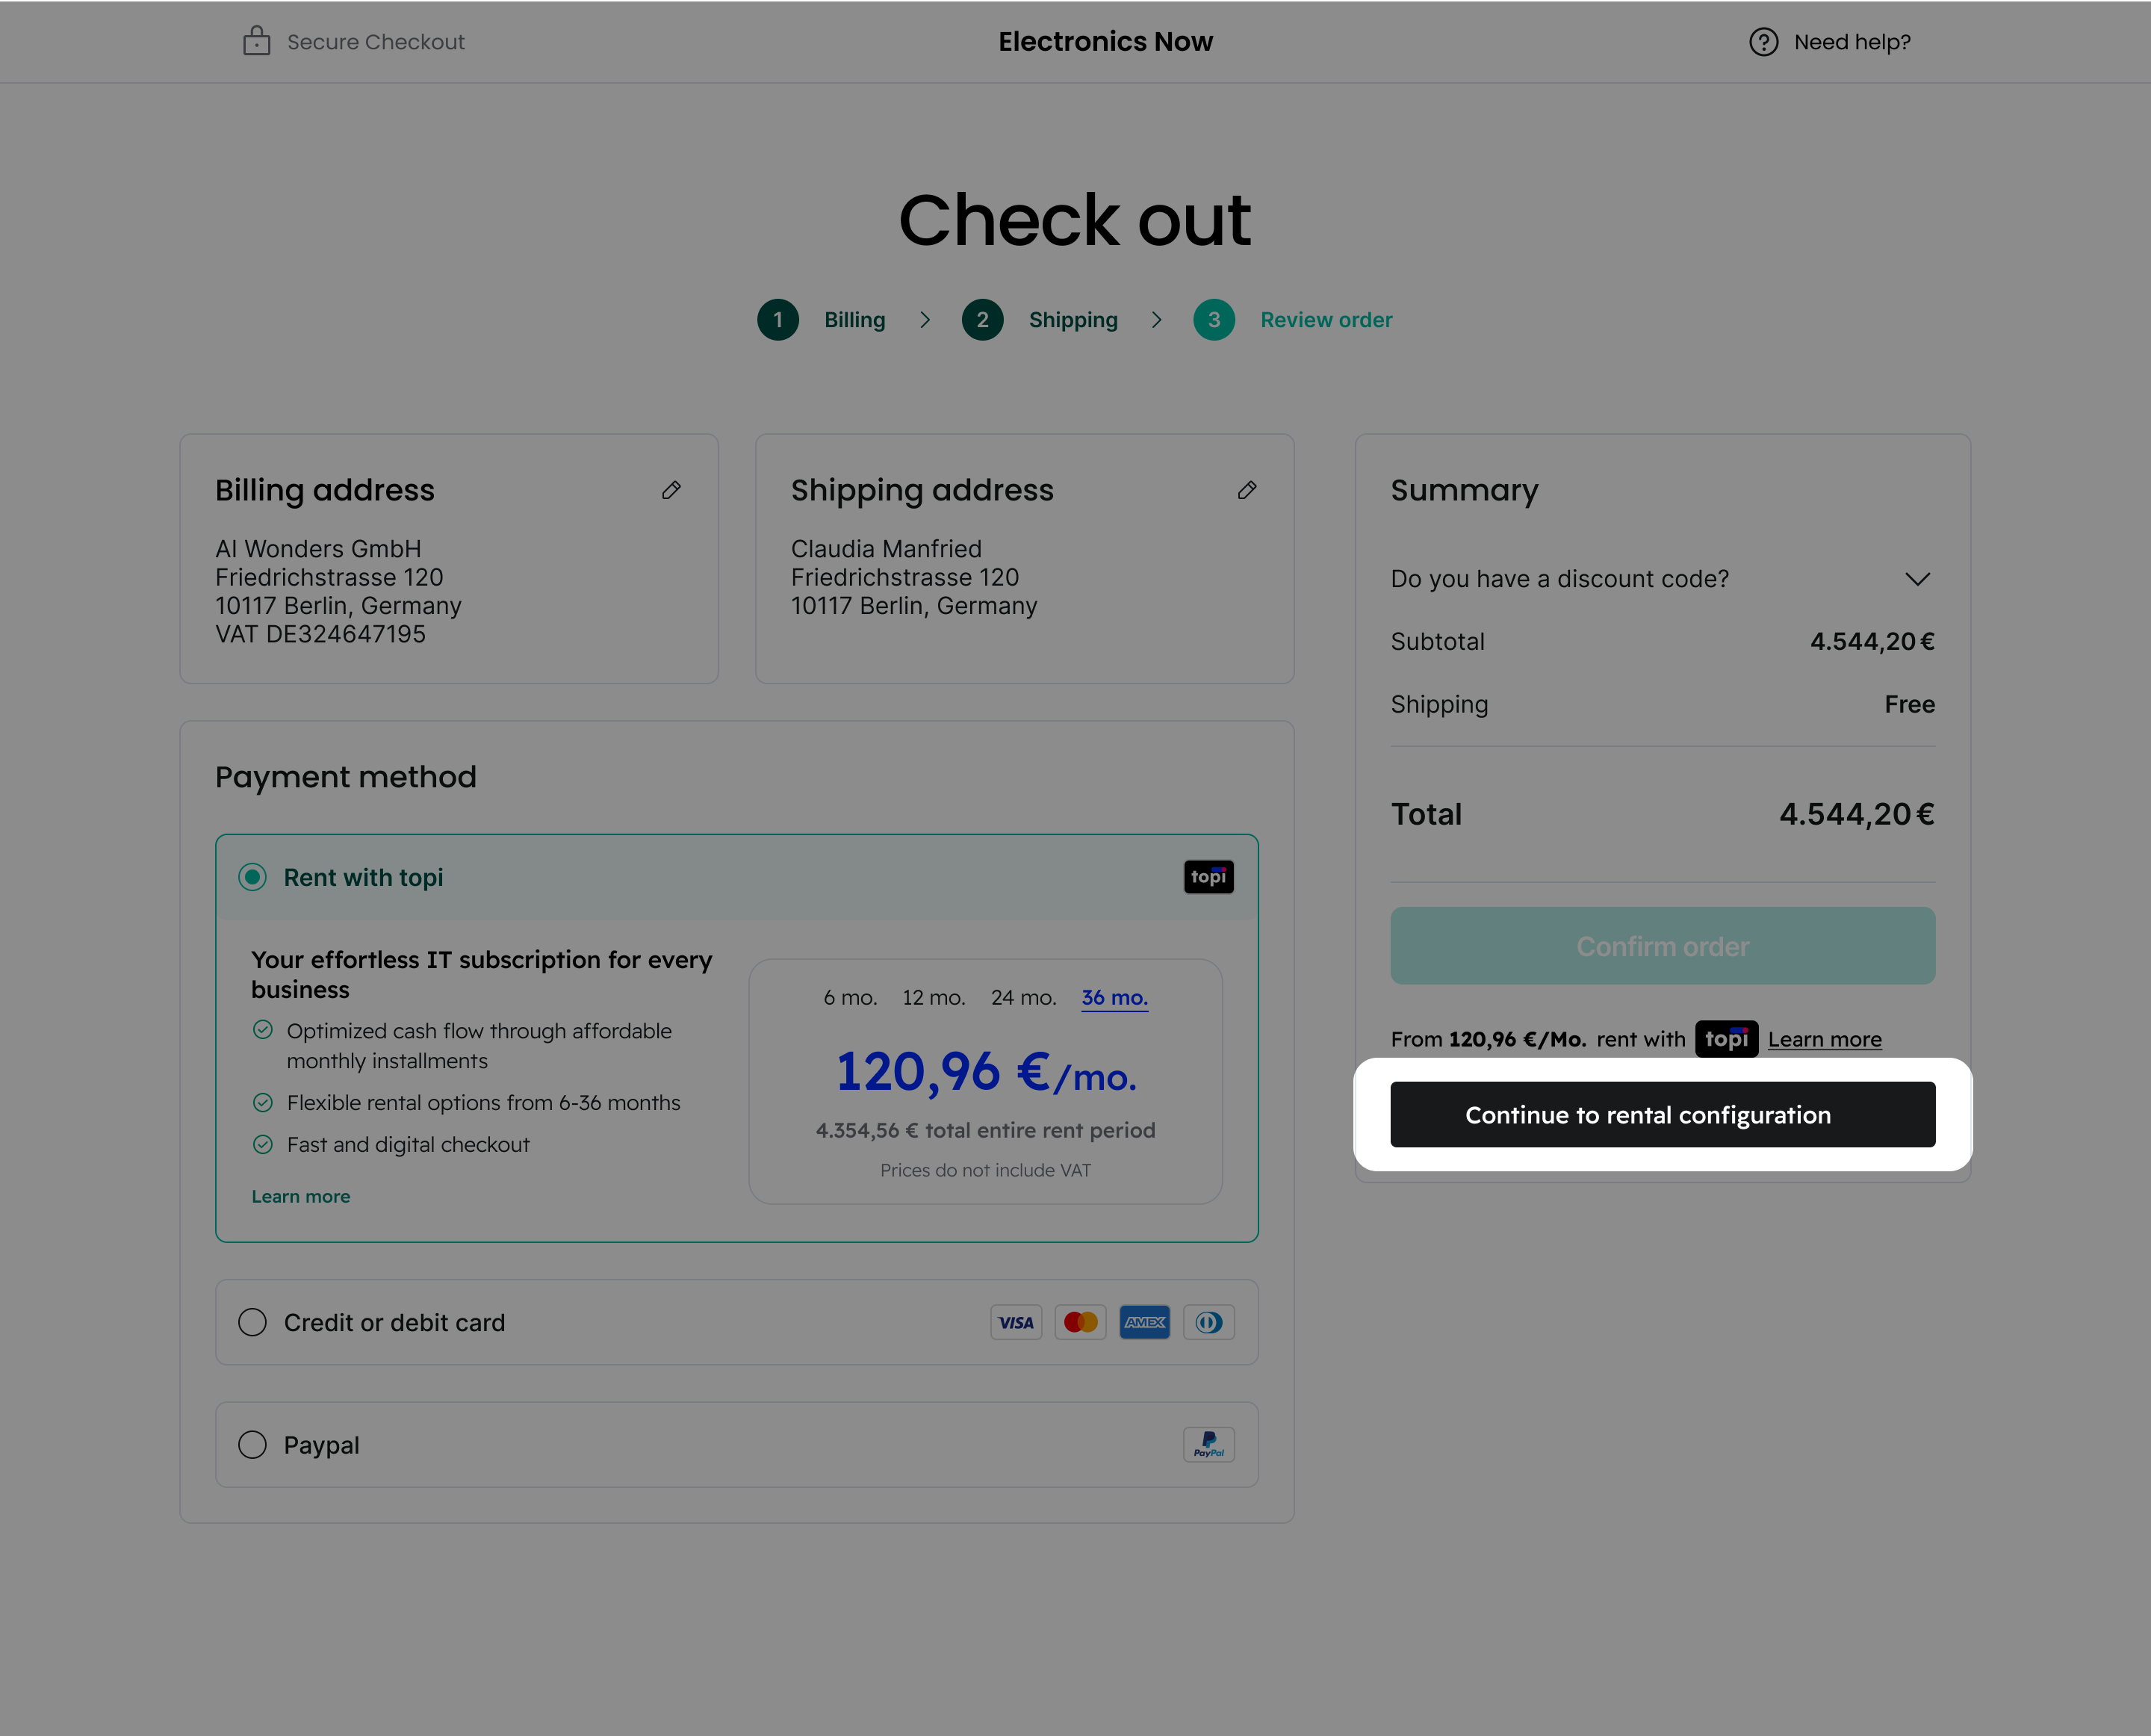
Checkout Button
General usage
To render a topi Checkout Button, place this HTML on a specific part of any page:
<x-topi-checkout-button></x-topi-checkout-button>
And tell topi Elements about the contents of the cart using JavaScript:
topi.cartItems = [
  {
    price: {
      currency: "EUR",
      gross: 119000,
      net: 100000,
      taxRate: 1900,
    },
    quantity: 1,
    sellerProductReference: {
      reference: "10",
      source: "SAP",
    },
  },
  {
    price: {
      currency: "EUR",
      gross: 89900,
      net: 75546,
      taxRate: 1900,
    },
    quantity: 2,
    sellerProductReference: {
      reference: "20",
      source: "SAP",
    },
  },
];
The Checkout Button will not render without the checkout-mode attribute. Always specify either checkout-mode="cart" or checkout-mode="product".
Placements
This element is designed to be used on several pages:
- On the Cart page
- On the Payment selection page
- On the PDP page
Usage on Cart and Payment selection pages
Exactly as described in General usage.
Usage on PDP page
First, read the considerations stated in Usage by pages > Product detail page (PDP).
If you've decided that you want the topi Checkout Button on your PDP, learn how to do it with the checkout-mode option.
Conditional rendering
By default, the Checkout Button will look at the cart's contents to determine whether it should render or not. If the entire cart can be checked out with topi, then it will render. If one or more items cannot be checked out, then the button will not render.
Displaying a "Checkout with topi" button when the cart cannot be checked out with topi would lead to an error when your server attempts to create an offer via the topi API. This is why topi Elements does not render the button in that case.
To be clear, "can be checked out" refers to items that:
- Customers can choose to rent or purchase, or
- Customers can choose only to purchase
If you want to make the Checkout Button render according to a single PDP item instead of the entire Cart, you can specify the checkout-mode attribute and pass in the PDP item being viewed. See Options > checkout-mode.
Click handlers
When the button is clicked, it needs to trigger the creation of an offer on your backend. This behavior is not provided by default by the button element. To achieve this, you must handle the click event by adding an event listener to the button element.
You can do this either:
- by using
addEventListener - by passing an
onclickhandler function to the element.
<x-topi-checkout-button
  checkout-mode="cart"
  onclick="createOffer()"
></x-topi-checkout-button>

<script>
  function createOffer() {
    // ...
  }
</script>
For more information on how to create the offer, please refer to the API reference endpoint to see which fields are mandatory and which are not.
The curl example below shows how to create an offer. Before you proceed, ensure you have the necessary prerequisites:
- Authentication token: Learn how to generate one in the authentication guide.
- Products catalog: Find out how to import your catalog here.
- Shipping method: Understand how to set up a shipping method here.
PAYLOAD='{
    "customer": {
        "company": {
        "billing_address": {
            "city": "<string>",
            "country_code": "<string>",
            "line1": "<string>",
            "line2": "<string>",
            "postal_code": "<string>",
            "region": "<string>"
        },
        "name": "<string>",
        "tax_number": "<string>",
        "vat_number": "<string>"
    },
    "email": "<string>",
    "full_name": "<string>",
    "phone_number": "<string>"
    },
    "seller_offer_reference": "<string>",
    "exit_redirect": "<string>",
    "expires_at": "<string>",
    "lines": [
        {
        "price": {
            "currency": "<string>",
            "gross": <number>,
            "net": <number>
        },
        "quantity": <number>,
        "seller_product_reference": {
            "reference": "<string>",
            "source": "<string>"
        },
        "title": "<string>"
        }
    ],
    "sales_channel": "<string>",
    "shipping": {
        "price": {
            "currency": "<string>",
            "gross": <number>,
            "net": <number>
        },
        "seller_shipping_reference": "<string>"
    },
    "shipping_address": {
        "city": "<city>",
        "country_code": "<string>",
        "line1": "<string>",
        "line2": "<string>",
        "postal_code": "<string>",
        "recipient_name": "<string>",
        "region": "<string>"
    },
    "success_redirect": "<string>"
}'

curl -X POST 'https://seller-api.topi.eu/v1/offers' \
-H "Authorization: Bearer $TOKEN" \
-H "Content-Type: application/json" \
-d "$PAYLOAD"
Options
checkout-mode (required)
Because the checkout button can be used in different placements, you must explicitly specify its mode.
If you want to render the topi Checkout Button on your Product detail page (PDP) to provide a faster checkout experience, set the mode to "product".
More commonly, you'll be rendering the topi Checkout Button on your Cart page or Payment selection page. In those cases, set the mode to "cart".
The point is for returning customers to skip some steps in the checkout process. Usually, clicking a checkout button on the PDP would redirect the customer directly to the topi hosted checkout with a single item in the offer. However, there are also ecom stores that will add the current PDP item to the cart, and then redirect the customer to the topi hosted checkout with all the cart items in the offer. For details on this, see Usage by pages > PDP.
checkout-mode | Behaviour |
|---|---|
| cart | Button's conditional rendering behaviour is based on the Cart items |
| product | Button's conditional rendering behaviour is based on the single PDP item |
Example:
<!-- based on the single PDP item -->
<x-topi-checkout-button checkout-mode="product"></x-topi-checkout-button>

<!-- based on Cart items -->
<x-topi-checkout-button checkout-mode="cart"></x-topi-checkout-button>

<!-- will never render (a helpful error message will be logged to console) -->
<x-topi-checkout-button></x-topi-checkout-button>
// if using "product" mode, make sure to set the PDP item
topi.pdpItem = {
  // ...
};

// if using "cart" mode, make sure to set the cart items
topi.cartItems = [
  // ...
];
verb
This feature is not yet in our latest production build, but it should be in the next few weeks. If you urgently need this feature, please reach out to your topi point of contact.
You can choose among presets for the string inside the Checkout Button, depending on the context in which it is rendered:
verb | String (en) | String (de) |
|---|---|---|
| "checkout" (default) | Checkout with topi | Zur Kasse mit topi |
| "rent" | Rent with topi | Mieten mit topi |
Example:
<!-- renders "Rent with topi" -->
<x-topi-checkout-button verb="rent"></x-topi-checkout-button>

<!-- renders "Checkout with topi" (default) -->
<x-topi-checkout-button></x-topi-checkout-button>
disabled-if-cannot-checkout
This feature is not yet in our latest production build, but it should be in the next few weeks. If you urgently need this feature, please reach out to your topi point of contact.
You can choose to make the Checkout Button render disabled instead of not rendering on the page if the cart cannot be checked out.
disabled-if-cannot-checkout | Behaviour |
|---|---|
| false (default) | Button is not rendered |
| true | Button is disabled instead of not rendered |
Example:
<!-- true -->
<x-topi-checkout-button disabled-if-cannot-checkout></x-topi-checkout-button>

<!-- false (default) -->
<x-topi-checkout-button></x-topi-checkout-button>